

[kh2walkthrunav]
A Foreboding Castle
The castle our heroes journey to is a bit scary looking, but something about it seems familiar. Turns out, it’s the home of the Beast, who helped the gang out during their first adventure. But first things first: a Heartless is spotted sneaking its way into the “Parlor”, so follow it inside.
Event: Survive the Swarm of Shadows
|
 This battle is actually impossible to clear. The Heartless will keep on coming until the Beast enters the room to save you. To make sure the Shadows don’t overwhelm you, try to clump them together and take them out in groups. Defeating several of them at a time will help clear parts of the room and give you space to move. Use the Fire spell if you ever get surrounded.
When the Beast shows up and lays down the law, he seems a bit distracted by the mysterious rose on the table. Something’s definitely not right, so it’s time to explore the castle for more clues. Head out of the “Parlor” and climb the staircase off to the right to enter the “East Wing”. Follow the hall all the way down, taking out any Heartless that may appear, until you reach the door at the end of the hall. Approach it to trigger a cutscene with Belle.
Search and Rescue
Belle explains that the Beast hasn’t really been himself lately and that he’s placed all of the castle’s inhabitants in the “Dungeon”. It’ll take some doing to get there, seeing as it’s on the opposite end of the castle, but if you head back to the “Entrance Hall” and climb the staircase up to the left, you’ll enter the “West Hall”. The door to the “Undercroft” is toward the end of the hall, but there’s a very large wardrobe blocking the entrance.
Event: Don’t Wake the Wardrobe!
|
 To get at the “Dungeon”, you’ll need to move the Wardrobe out of the way. She’s napping right now, but if you try to move her at the wrong time, you’ll wake her and be seen. The trick is to rapidly press the Triangle Button when prompted with the Push Reaction Command. Be sure to watch for when the Wardrobe shifts slightly, because this means that the Waken Reaction Command is coming up. Do not trigger this Reaction Command, or you will waken the Wardrobe and have to start all over. Continue this pattern until the Wardrobe is completely out of the way, revealing the door to the “Undercroft”.
After clearing the Wardrobe challenge, a brief cutscene plays. Following that, head into the “Undercroft” through the door. A rather mischievous Heartless is waiting for you when you arrive.
Boss: Thresholder & PossessorHP: 137 (Thresholder), 98 (Possessor)
Once they’ve been defeated, approach the Thresholer and start attacking. The Thresholder will retaliate of course, and will also summon some Hook Bat Heartless to attack you as well. Concentrate on the Thresholder until its HP reaches 0, then follow up with the Release Reaction Command. This will reveal the true adversary, the Possessor! The Possessor is a small gaseous Heartless that will float around the room. It will not attack you, so you can just power on through with combos of your own. Deal as much damage as you can to the Possessor before it returns to the door to revive the Thresholder. If this happens, you’ll have to take out the Thresholder again as you did before. This time however, the Thresholder has the power to use dark energy projectiles in addition to its claw attacks. This is a good opportunity to enter Valor Form, as the increased speed and power will allow you to make quick work of the Thresholder. Use the Release Reaction Command again to reveal the Possessor, then follow up with more combos. This second assault on the Possessor should be enough to defeat it for good. Victory against Thresholder & Possessor earns you the Upper Slash Ability for Sora, the Donald Fire Ability for Donald, and an HP +4 Get Bonus for Goofy. |
 The vicious Heartless fused into the “Dungeon” door is known as the Thresholder, and it attacks with wide-range claw swipes that really can pack a punch. The Thresholder will start off by summoning two Heartless to its side (either Gargoyle Knights or Gargoyle Warriors, or a combination of the two). If you lure the Heartless toward the upper balcony in the back of the room, the Thresholder’s attacks won’t be able to hit you while you take out the Heartless.
Confronting the Beast
After defeating the Thresholder and Possessor, you can access the “Dungeon”, where you’ll encounter the rest of the castle’s inhabitants. Now it’s time to find the Beast and get the whole story behind his recent strange behavior. Head back into the “Undercroft” and jump up to the back balcony. Cogsworth will move the armored knights that block the door, revealing a hidden door to the “Secret Passage”. Head inside and you’ll have to complete a small challenge in order to press onward to the “West Hall”.
Event: Light the LanternsNote: Don’t Let Cogsworth’s Grip Slip!
|
 After Cogsworth initiates the crank, three lanterns drop from various locations throughout the “Secret Passage”. You need to guide Mrs. Potts and Lumiere to each of these lanterns so that you can light them and open the door leading to the “West Hall”. Lumiere and Mrs. Potts will follow you automatically, but you need to clear out the boxes that block their access to the lanterns. Once everybody is in front of a lantern, use the Sprinkle Reaction Command to light the lantern. You need to do this to all three lanterns, but you’ll need to be quick. If Cogsworth’s grip slips off the crank, the lanterns will retract back into the ceiling. If you see that his Grip Gauge is low, run back quick and use the Restore Reaction Command on him to replenish his strength a little bit.
With the door open, head into the “West Hall” and go straight across and up the stairs to the “West Wing”. Defeat any Heartless that show up as you make your way down the hall to the “Beast’s Room” at the very end.
Boss: BeastHP: 156 STR: 15 DEF: 8
Victory against Beast earns you an extra Armor Slot Get Bonus for Sora, an HP +4 Get Bonus for Donald, and the Defender Ability for Goofy. |
 Time to snap the Beast out of his rut! The key to breezing through this battle is to make good use of Cogsworth. Use the Wake Up Reaction Command when prompted to blast the Beast with light, dazing him for a moment. While he’s momentarily stunned, power through with a few combos, then follow up with another Wake Up Reaction Command to repeat the pattern. After about 4 or 5 uses of the Wake Up Reaction Command, you’ll probably have to replenish Cogsworth’s energy with the Charge Reaction Command. Rapidly press the Triangle Button to charge up energy, then release it with Get Up Reaction Command. This is often a powerful enough blow to finish the battle.
The Search for Belle
With the Beast’s senses restored, you can now add him to your Party. Make your way all the way back to the “East Wing” and enter “Belle’s Room”. The Wardrobe is inside, and she says that Belle went off looking for Xaldin. Head back down to the “Entrance Hall” for a brief cutscene. Turns out, Belle is in the “Ballroom”, so head in there to find her.
Boss: Shadow StalkerHP: 176 STR: 15 DEF: 8
Attack the Shadow Stalker directly as it moves from item to item, dealing as much damage as you can before it possesses something else in the room. If the Shadow Stalker ever possesses the chandelier or a pillar along the side, avoid taking damage from the attacks that ensue, then make your way to the possessed object and deplete its HP. Follow up with the Release Reaction Command to force the Shadow Stalker back out into the open, where you can unleash more damage. If it ever sinks into the floor, keep moving to avoid the small dark energy orbs that come out of the floor. When the floor beneath Sora glows, the Shadow stalker is about to come back up, so jump to avoid getting hit. Repeat this pattern until the Shadow Stalker’s HP reaches 0. It’s best not to use Valor Form for this fight, but instead, rely on Beast’s Twin Howl Limit Command to deal impressive damage. The real fight has yet to come! |
 The Shadow Stalker is essentially a larger, more ferocious Possessor, and will attack by taking control of various items throughout the ballroom. Right off the bat, the Shadow Stalker will make its way to the large glass windows at the back of the room. Get off to the side under the balcony to avoid being hit by the energy blast that ensues.
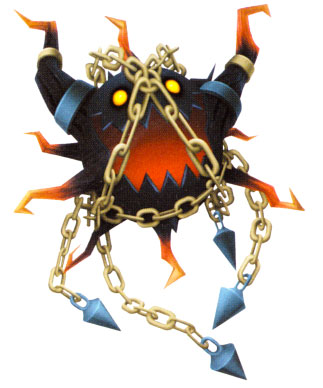
Boss: Dark ThornHP: 390 STR: 15 DEF: 8
The Dark Thorn starts off the battle in an invisible state, but you can still follow his movements with the Lock On feature. Now is a good time to use Valor Form to really pound the Dark Thorn senseless. Watch for instances in which you can use the Step Vault Reaction Command to jump up to the chandelier. Follow up with the Catch Reaction Command to grab hold and drop the chandelier, then execute the Pendulum Round Reaction Command to whirl the chandelier around and bash the Dark Thorn back. This series of Reaction Commands will not only deal some pretty good damage, but they will also make the Dark Thorn visible again. If at any point, the Dark Thorn launches Sora across the room, be ready to trigger the Slingshot Reaction Command when prompted. This will allow you to bounce back by swinging around a pillar and knock the Dark Thorn back. When Valor Form wears off (and it will do so well before the battle is over), use the Beast’s Twin Howl to deal more significant damage, and as always, keep moving to avoid the Dark Thorn’s more ferocious attacks. Victory against the Dark Thorn earns you an HP +5 Get Bonus and the Retaliating Slash Ability for Sora, an HP +4 Get Bonus for Donald, an extra Item Slot Get Bonus for Goofy, and an HP +35 Get Bonus for Beast. |
 The Shadow Stalker transforms and the creature’s true form is revealed! The Dark Thorn is an absolutely vicious opponent that attacks with feral lunges and furious claw swipes. It can also move very quickly, so you’ll need to keep moving throughout this encounter!
After the dust settles, the Beast and Belle are reunited. Sora obtains the Cure Element, allowing him to now perform Cure Magic. The Keyhole for the next world is now unlocked, so it’s time to move on.
